

Agents
An agent is an AI assistant that handles conversations for you. It is set up under Settings > Agents, with its own General settings and API Tokens, and it is assigned to the Inboxes it works in.
An agent works inside an inbox and can handle a conversation on its own. It is assigned to inboxes the way a user is, so it only answers contacts in the inboxes you gave it.
Relations
- Inbox — an agent is assigned to the inboxes it works in.
- Conversation — a conversation is assigned to a user or an agent.
- API token — an agent has its own tokens.
- User — a hosted agent has users attached to it.
- Action — an agent can run an action, and Request Evaluation can send an evaluation to one.
Types
An agent is one of two types, chosen when you create it.
- Hosted — an agent that runs inside Applyfin, with its own instructions, skills, memory and MCP tools.
- Custom — an agent that runs on a system of your own. Applyfin sends events to its webhook, and your system does the work.
The type decides which settings the agent has. Instructions, Skills, Memory, MCP Servers and Users only appear on a hosted agent.
Creating an agent
To have conversations answered for you, create an agent.
- Open Settings > Agents and select Create New.
- On Type, keep Hosted or select Custom.
- Select Next.
- For a hosted agent, pick the Driver on its own step and select Next.
- On General, fill in the Name and a Description.
- Check the Username, which is filled in from the name.
- Leave Active on.
- Fill in the type's own fields, described below. For a hosted agent that is the optional Models it may run, its Default Model and, when the model takes one, its Default Effort.
- Select Next.
- For a hosted agent, write the Instructions.
- Select Create Agent.
The agent appears under Settings > Agents, not yet assigned to any inbox.
Custom settings
A custom agent asks where to send events and how to sign in there.
- Webhook URL — the address events are sent to.
- Headers — sent with each request. Write
${CREDENTIAL}as a value to use a credential. - Credentials — stored encrypted and never shown again.
Hosted settings
A hosted agent asks which driver it runs on and how to sign in to the AI provider.
- Driver — the base driver the agent runs on, picked from the cards on the Driver step. It is set once, when the agent is created, and cannot be changed afterwards.
- Authentication Method — how the agent signs in to its AI provider. The choices depend on the driver: Claude Code and Codex take a Personal Account or a Project; OpenCode takes the provider whose key you bring, such as OpenRouter, Anthropic or OpenAI.
- OAuth token for a personal account, or the API key for any other method. It is stored encrypted and never shown again.
A driver that runs on Applyfin's own key, such as Marlin, asks for no Authentication Method or secret. After the driver, the agent only needs its general settings.
Models
A hosted agent carries the defaults a chat runs on when a prompt doesn't say. All three are optional.
- Models — every model a chat with this agent may switch to, picked from the driver's catalog. On OpenCode the catalog is the provider's you chose as the Authentication Method. Leave it empty to allow the whole catalog.
- Default Model — one of the selected models (any model in the catalog when none are selected). It runs when a prompt doesn't pick one; Driver's default leaves it to the driver.
- Default Effort — how hard the default model thinks when a prompt doesn't say. Only a model that takes an effort shows it; Model's own default leaves it to the model.
Change them later on the agent's General tab. The default model has to stay on the list, and the default effort has to be one the default model takes — picking a model that takes none clears it.
Writing instructions
To tell a hosted agent how to behave, write its instructions.
- Open Settings > Agents, select the agent, then select Instructions.
- Write the instructions in Markdown.
- Select Save Instructions.
Giving an agent skills
A skill is a reusable procedure the agent loads when a task matches it: a name, one line on when to use it, and the instructions in Markdown. A hosted agent lists its skills on its Skills tab and picks one up on its own when a task calls for it.
To add one:
- Open the agent and select Skills.
- Select Add Skill.
- On Source, pick From the library, Import a file or Write your own.
From the library:
- Select Next.
- Pick the skills to add. A skill the agent already has reads Added.
- Select Add skill (or Add n skills).
The copies are the agent's own from then on: edit them like any other skill, and a later change to the library does not follow.
Importing a file:
- Select Next.
- Drop a markdown file on the step, or click it to browse. A
SKILL.mdbrings its name and description along in its frontmatter; any other.mdfile is imported as the instructions, named after the file. - Check the name and description, and fill in what the file did not carry.
- Select Import skill.
Writing your own:
- Select Start writing. A blank skill opens in the editor.
- Fill in the name, using lowercase letters, digits and single hyphens, such
as
application-screening. - Under it, write when the agent should use the skill.
- Write the instructions in the editor.
- Select Create skill.
Select a skill in the list to edit it, then Save skill; Delete skill under the editor removes it. The agent has the change from its next turn.
Managing memory
A memory is something the agent carries between sessions, as a small Markdown note with a name. The agent writes its own as it works, and you can read, correct and add to them on its Memory tab.
To write one:
- Open the agent and select Memory.
- Select New Memory.
- Fill in the name, using lowercase letters, digits and single hyphens, such
as
hiring-manager. - Under it, add a one-line summary if you like.
- Write the note in the editor.
- Select Create memory.
Select a memory in the list to edit it, then Save memory; Forget memory under the editor removes it. The agent has the change from its next turn.
Connecting MCP servers
To give a hosted agent tools, such as access to your calendar or another system, connect an MCP server to it.
- Open Settings > Agents, select the agent, then select MCP Servers.
- Turn on the switch on the server's card.
- For a server that asks for them, fill in the credentials and select Connect.
The card reads Connected. Turn the switch off to disconnect it again.
Assigning an inbox
To put an agent to work, assign it to the inboxes it should answer in.
- Open Settings > Agents, select the agent, then select Inboxes.
- Select Assign Inbox.
- Find the inbox.
- Select Assign on its row.
- Confirm on Assign Inbox.
The agent can now read and reply in that inbox.
To remove it, select Unassign on the inbox's row and confirm.
Handing over conversations
Assigning an inbox lets an agent work there, but does not give it any conversations yet. Conversations reach an agent through the inbox's auto-assignment, covered under Assigning conversations automatically.
Set the Type to Agent, and pick a Strategy. Dedicated sends every conversation to one agent. The other strategies spread them across the agents in the inbox.
Chatting with an agent
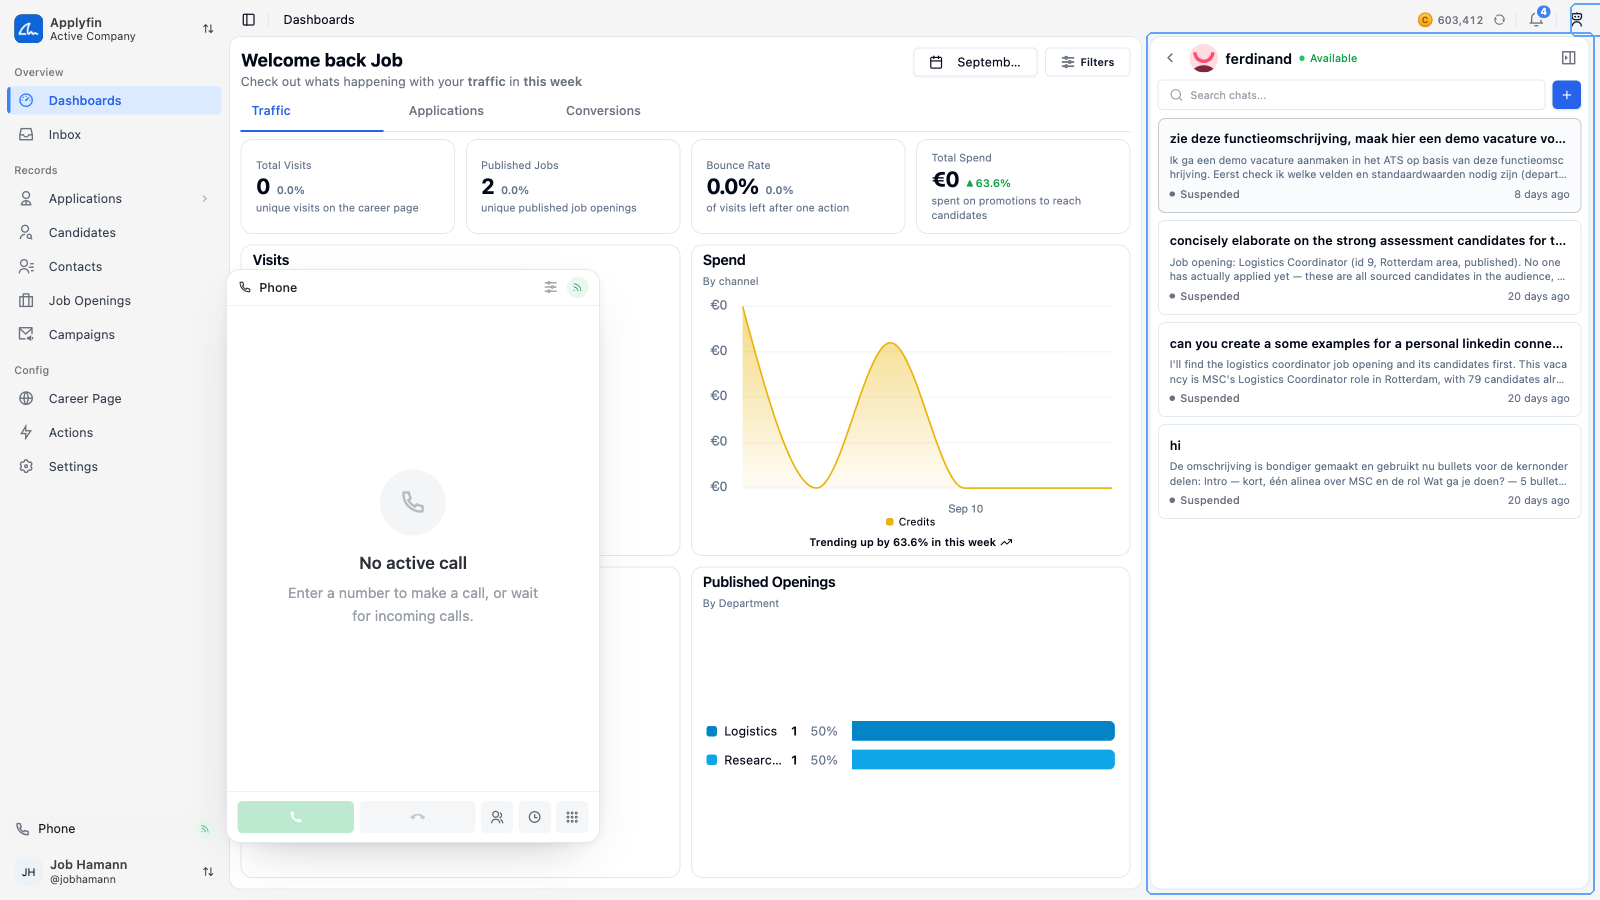
To ask a hosted agent to do something directly, open a chat with it.
- Select the assistant icon in the top bar to open the Agents panel.
- Search for the agent and select it.
- Select New chat, or pick a thread you started earlier.
- Write your message.
The agent answers in the chat, and the chat is kept so you can come back to it. The panel stays open while you move through the app, so you can ask for something while you look at the board or a record.
The list shows every chat with the agent, newest first. Switch it to Active next to the search box to see only the chats that are running right now; All brings the suspended and failed ones back.
What to ask an agent
An agent works with your records through its tools, so you can ask it to do things you would otherwise click through yourself.
- Update applications — "Move everyone in Call Booked who has not replied in a week to Call Not Booked."
- Create a job opening — paste a job description and ask for a draft job opening in the right department.
- Set up a department — "Create a Customer Service department with the stages New, Screening, Interview, Offer and Hired."
- Summarise applications — "Give me the three strongest applications for Logistics Coordinator and why."
- Draft outreach — "Write a LinkedIn connection note for the sourced profiles of this role."
- Report — "How many applications came in this week per source?"
The agent asks before it changes anything it is unsure about, and the chat reads Needs your input until you answer.
A chat reads Working… while the agent is busy, and Needs your input when it has asked you something. A chat that stopped reads Suspended or Failed; select Resume session (or Try again) under the thread to bring it back. While the agent starts up, a progress bar takes the place of the message box and shows each step (allocating a sandbox, loading the agent, connecting). The box returns once the bar is full. Stopping a chat reads Suspending… until the session is put away.
While the agent is working, the send button becomes a stop button: select it to cut the turn short. What the agent had written so far stays in the thread, an Interrupted line marks where it stopped, and the agent is ready for your next message. The same button interrupts a compaction in progress. Start typing and it turns back into the send button — a message sent now is queued (see below); clear the box to get the stop button back.
Queuing messages
You don't have to wait for the agent to finish. Send a message while it is working and it is queued: it shows dimmed under the thread, marked Queued — runs next, and the agent picks it up as its next turn as soon as the current one ends. Send more and they line up in the order you sent them, up to ten at a time. Each runs on the model and effort picked when it was sent.
Select × next to a queued message to take it back out. Stopping the current turn doesn't touch the queue — the queued messages still run after it — so remove them first if they shouldn't. When a chat is suspended or fails, its queue is dropped along with it.
Choosing a model and effort
Under the message box, two pickers set what your next message runs on:
- Model — one of the models the agent allows (its Models list). It starts on the agent's Default Model.
- Effort — how hard that model thinks. It only shows for a model that takes one, and starts on the agent's Default Effort or the model's own.
Each message runs on the picks at the moment you send it, so you can switch between messages freely — the thread carries on. The pickers are yours: they stay put across the agent's chats and never change the agent's defaults.
Pasting long text
Paste text of more than one line — a document, an email, a log — and the message box folds it into a Pasted Content +n chip, where n is its line count, so what you write around it stays readable. The agent gets the full text. Backspace over the chip to drop the paste; a second paste gets its own chip. Single-line pastes go in as plain text.
In the thread your message shows the same chip; select it to read what was pasted. A message and its pastes together may not exceed 100 000 characters.
Attaching files
Send a file with a message and the agent reads it: a CV, a job description, a spreadsheet, a screenshot. Select the paperclip under the message box and pick the files, drop them on the message box, or paste them from the clipboard. Each file shows as a chip above the text, with a × to take it off again. A message takes up to ten files of 20 MB each, of any type.
The files go up with the message when you send it. In the thread they show as chips at the top of your message; select one to open it. A file stays with the chat: the agent can come back to it in a later turn, and it is removed with the chat.
Attaching users
A hosted agent has users attached to it, on its Users tab. Select Attach User to add one, and Detach on a row to remove one.
Reading the status
An agent is Active, Inactive, Warning or Error. The status shows in the agent's header and in the list under Settings > Agents.